Introduction#
Moving from Classic UI to Freedom UI is on every Creatio roadmap sooner or later, because new platform capabilities ship Freedom-first. This guide is the migration path in the order we run it on real projects: preparation, customization, testing, then user training. The sequencing matters; it is what keeps you from redoing work.
Overview of Migration#
The migration process involves several key steps:
- Introduction
- Key Differences Between Classic UI and Freedom UI in Creatio
- Get started with Creatio Freedom UI
- Step 1: Preparation for Migration
- Step 2: Creating Freedom UI Sections
- Step 3: Customizing Freedom UI Pages
- Step 4: Replacing Classic UI Sections in Workplaces
- Step 5: Ensuring Proper Functionality of Freedom UI Forms
- Step 6: Testing and Validation
- Step 7: User Training and Feedback
- Top Tips for a Successful Migration
- Conclusion
Key Differences Between Classic UI and Freedom UI in Creatio#
Creatio has evolved from Classic UI to Freedom UI, introducing several significant differences that enhance user experience and system functionality. Here are the key distinctions:
1. User Interface Design
- Modern Look and Feel: Freedom UI offers a more modern and intuitive design compared to Classic UI, focusing on user experience and ease of navigation. This includes a cleaner layout and responsive design elements that adapt to various devices.
2. Customization Capabilities
No-Code Development: Freedom UI emphasizes no-code development, allowing users to create applications and customize interfaces without extensive programming knowledge. In contrast, Classic UI often required more technical expertise for customization.
Composable Architecture: Freedom UI supports a composable architecture, enabling the integration of various applications and functionalities within a single platform. This is a shift from the more rigid structure of Classic UI.
3. Section Management
Dual Form Pages: Creatio objects can have both Classic UI and Freedom UI form pages. When both exist, Freedom UI pages take precedence, meaning they will be opened by default for actions like adding or editing records.
Migration Process: Transitioning sections from Classic to Freedom UI involves setting up new sections in Freedom UI while maintaining existing Classic sections until full migration is achieved. This allows for gradual adaptation by users
.
4. Application Structure
App vs. Package: In Freedom UI, applications are the primary unit of development, which can include multiple packages automatically created during app setup. This contrasts with the Classic UI’s reliance on packages as the main development unit.
Application Hub: The Application Hub in Freedom UI gives you one place to manage app sections, dependencies, and navigation, work that was spread across separate designers in the Classic UI.
5. User Experience Enhancements
Dynamic Interfaces: Freedom UI allows for dynamic interfaces that can be easily modified based on user preferences or roles, enhancing user engagement and satisfaction.
Improved Performance: The underlying architecture of Freedom UI is optimized for better performance and faster load times compared to Classic UI, contributing to a smoother user experience.
6. Transition Flexibility
- Gradual Transition: Users can operate both UIs simultaneously during the migration phase, allowing them to gradually adapt to the new interface while still having access to familiar functionalities in Classic UI.
These differences highlight how Creatio’s transition from Classic to Freedom UI not only modernizes its interface but also enhances customization capabilities and overall user experience, paving the way for more efficient business processes.
Get started with Creatio Freedom UI#
Turn on Freedom UI
To activate the Freedom UI shell in Creatio 8.2, follow these steps based on whether you are working with a new or existing instance:
For New Instances
- The Freedom UI shell is enabled out of the box for all new Creatio instances.
For Existing Instances
Access the UI Management Section:
- Navigate to the “Studio” workplace and select UI Management.
Open UI Preferences:
- Click on the UI Preferences tab.
Enable Freedom UI Shell:
To enable it for all users, select Switch to Freedom UI for all users. It is advisable to verify that existing customizations are compatible with Freedom UI before applying this change.
To enable it for a specific user group or individual user, click on New, select the desired user or group, check the Freedom UI is enabled checkbox, fill in the Priority field, and save your changes. Note that if there are conflicting rules, the one with the lower priority number will take precedence.
Log Out and Log Back In:
- Users must log out and then log back in to see the changes take effect.
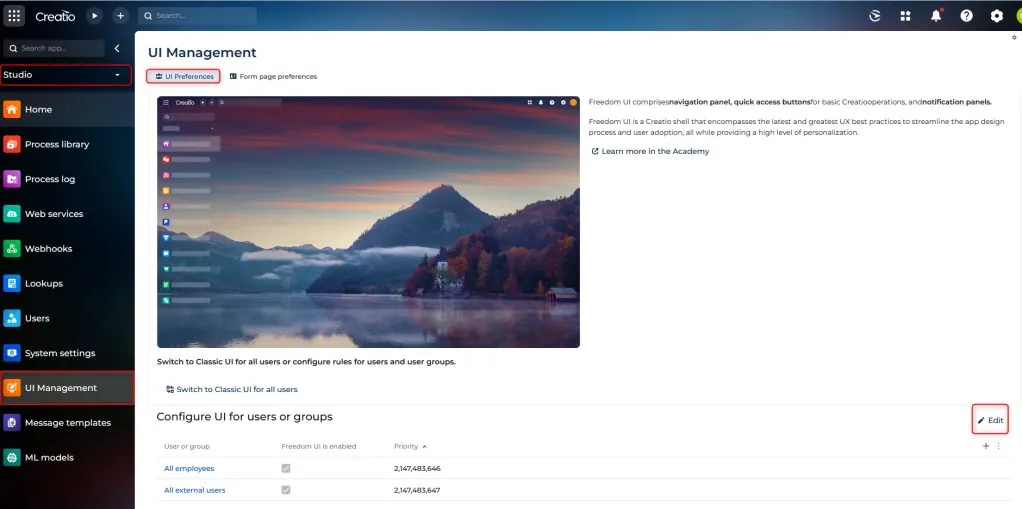
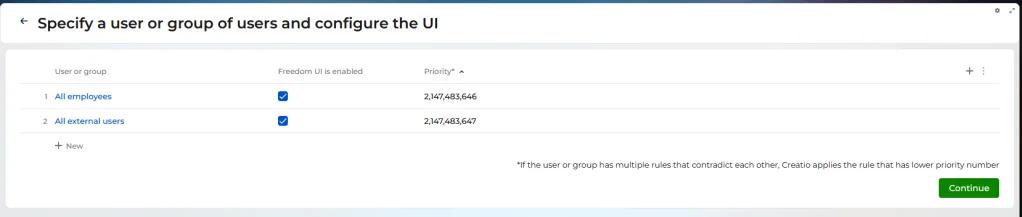
After activation, the URL format will change from [Creatio URL]/0/Nui/ViewModule.aspx to [Creatio URL]/0/Shell/, reflecting the switch to the new interface
Manage form pages in Freedom UI and Classic UI#
In Creatio, managing form pages in both the Freedom UI and Classic UI is essential for ensuring a smooth user experience. The platform allows for flexibility in how form pages are displayed, enabling users to specify preferences at both the site-wide and object-specific levels.
Overview of Form Page Management
Creatio objects can have distinct form pages in both UIs. For example, the “Contact” object has a Freedom UI form page in the Customer 360 app and a Classic form page in the Contacts section. When both types are available, the system defaults to opening the Freedom UI version for actions like adding or editing records, unless specified otherwise by an administrator.
Setting Up Form Page Preferences
To manage which form page opens by default, follow these steps:
Access the UI Management Section:
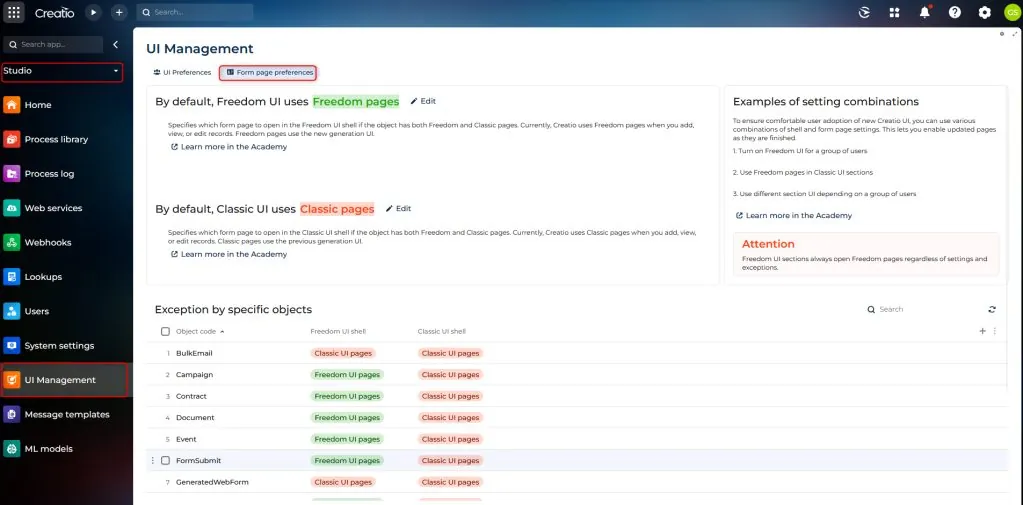
- Navigate to the Studio workplace and select UI Management.
Specify Sitewide Preferences:
- In the Form page preferences tab, you can set the default form page for both Freedom UI and Classic UI by adjusting the settings:
For Freedom UI: Set “Default form page in the Freedom UI shell” to either “Freedom UI pages” or “Classic UI pages.”
For Classic UI: Set “Default form page in the Classic UI shell” similarly.
- In the Form page preferences tab, you can set the default form page for both Freedom UI and Classic UI by adjusting the settings:
Log Out and Back In:
- Changes will take effect after logging out and back into Creatio.
Object-Specific Exceptions
If you need to override sitewide settings for specific objects, you can add exceptions:
Create a new entry in the Object-specific form page interface lookup.
Specify the object code (e.g., “Contact”) along with its corresponding form pages for both UIs.
Converting a Creatio Package to an Application#
Creatio 8.0 Atlas introduced an application layer that sits above packages. Converting an existing package into an application puts it under that layer, so your Classic and Freedom UI customizations live in one app that you manage and transfer as a unit.
Steps for Conversion
Create the Application:
- Begin by creating a new application record in the “Installed application” table (SysInstalledApp). This involves:
Adding a new lookup for the Installed application.
Filling in essential fields:
Name: The name of your application.
Code: A unique code for the application, which must be distinct within the system.
Maintainer: This value must match the “Maintainer” system setting (code: Publisher).
- Begin by creating a new application record in the “Installed application” table (SysInstalledApp). This involves:
Link Package to Application:
- Next, associate your existing package with the newly created application by adding a record in the “Package in installed application” table (SysPackageInInstalledApp). You will need to specify:
Installed application: Select the application created in step 1.
Package: Choose your existing package; it must not be locked.
Primary: Set this to true so the application treats this package as its primary one.
Application default: Also set this to true, which allows new items added within the application to be saved to this package.
- Next, associate your existing package with the newly created application by adding a record in the “Package in installed application” table (SysPackageInInstalledApp). You will need to specify:
Edit Application Details:
- After linking, edit the application’s metadata as needed, including the settings for how users see and open the application.
Additional Considerations
Packages alone remain valid for certain development tasks, but features specific to Freedom UI require an application.
Ensure that any dependencies or configurations required by your packages are maintained during this conversion process.
IMPORTANT: Don’t forget, now that you have the application, if you need to transfer your work to another environment, export the application to install in the other system, not the package.
Step 1: Preparation for Migration#
Before beginning the migration process, consider the following preparations:
Assess Customizations: Review all existing customizations in Classic UI to determine what needs to be replicated or modified in Freedom UI. Note which pages deserve a redesign rather than a straight copy.
Plan for Business Rules: Ensure that any business rules currently used are compatible with Freedom UI, as some may not function the same way due to architectural differences.
Backup Data: Always back up your current environment before making significant changes.
Step 2: Creating Freedom UI Sections#
To create a Freedom UI section based on an existing Classic UI section:
Add a Freedom UI Section:
In your new app, add a section for the object that already has a Classic UI section.
Ensure that you are working within the same package if you want to maintain all customizations together.Bind Packages:
If necessary, bind any packages containing customizations from Classic UI to your new app.
To bind packages containing customizations from Classic UI to your new app in Creatio, follow these steps:
Steps to Bind Packages
Open System Designer:
- Navigate to the top right corner and select “System setup” followed by “Lookups”.
Create a New Lookup:
Click on New lookup in the Lookups section toolbar.
Fill in the Name property with an arbitrary name (e.g., “App package”).
Set the Object property to “Package in installed application”.
Save the Lookup:
- After entering the necessary details, click Save on the lookup setup page’s toolbar.
Select App Package:
Open the App package lookup and filter for the installed application you wish to modify.
Select an arbitrary record from the lookup list.
Bind Classic UI Section Package:
In the Package column, select the package that implements the Classic UI section (for example, “UsrExpensesPackage” for the Expenses section).
Save your changes.
Verify Binding:
- Confirm the package is now bound to your Freedom UI app, so the app can use the Classic UI section’s functionality.
Additional Considerations
- If you encounter limitations in transferring all customizations from Classic UI to Freedom UI, consider moving Classic UI section schemas directly into the app package using Creatio IDE.
This process enables a smooth transition and integration of existing customizations into your new application framework within Creatio.
Step 3: Customizing Freedom UI Pages#
Once you have created the Freedom UI sections, customize them according to your business needs:
Recreate Functionality: Use the Freedom UI Designer to replicate or enhance the functionality of Classic UI sections. Take advantage of the advanced capabilities offered by Freedom UI for improved user experience.
Implement Custom Code: If necessary, developers should be prepared to write custom code to achieve desired functionalities that may not be available out-of-the-box in Freedom UI.
Set Up Business Rules: Create or adjust business rules specific to your new Freedom UI pages.
Add Custom Lookups: If your Classic UI section had custom lookups, manually add them in the Freedom UI Designer.
Step 4: Replacing Classic UI Sections in Workplaces#
After customizing your Freedom UI sections, replace the Classic UI sections in your workplaces:
Access Workplace Setup:
Open the System Designer and navigate to “Workplace Setup”.Select Workplace:
Choose the workplace where you want to replace the Classic UI section (e.g., Service).Add Freedom UI Section:
Click on the button to add sections and select your newly created Freedom UI section.Remove Classic UI Section:
Select the Classic UI section and delete it from the workplace.Repeat for Other Workplaces:
Ensure that all relevant workplaces are updated with the new Freedom UI sections.
Step 5: Ensuring Proper Functionality of Freedom UI Forms#
To ensure that users always access the correct form pages:
Replace any instances of Classic UI sections with their corresponding Freedom UI versions in workplace settings.
Change system settings if needed so that all objects default to opening their Freedom UI forms instead of Classic ones.
You can also manage exceptions for specific objects if necessary.
Step 6: Testing and Validation#
Before rolling out changes to all users, conduct thorough testing:
Test Functionality: Click through every feature in the new Freedom UI sections against how it behaved in Classic.
User Acceptance Testing (UAT): Put end-users on the new sections early enough that what they find can still change the rollout.
Step 7: User Training and Feedback#
Once testing is complete and issues have been resolved:
Conduct User Training: Run sessions on the new Freedom UI screens, and call out what moved from Classic UI so people are not hunting for familiar buttons.
Gather Feedback: A week after go-live, ask users what is slower or missing. That list is your follow-up backlog.
Top Tips for a Successful Migration#
Inventory customizations first:
What exists in Classic UI decides the order and the effort of everything below, so the Step 1 review is not skippable.Learn the Freedom UI Designer before migrating:
Page layout works differently from the Classic designer, and fighting it mid-migration costs more than an afternoon of practice up front.Rebuild pages rather than copying them:
Freedom UI gives you more layout control than Classic; a pixel-for-pixel copy spends the migration without collecting its benefit.Roll out gradually:
Release one section at a time and fold what the first team reports into the next section’s build.Training and documentation:
Run training sessions and write documentation covering the new screens and workflows.Test before you ship:
Unit tests plus UAT, on the workflows people actually run daily rather than a demo path.Watch your package bindings:
New schemas must land in the app’s package, not in Custom, or the work will not transfer with the app.Keep both UIs available during the transition:
The form-page lookups described above let users fall back to Classic while their section migrates.Have a rollback plan:
Know how you would restore the Classic sections if something serious surfaces after go-live.
Conclusion#
A Freedom UI migration succeeds or fails on sequencing: prepare the packages first, migrate section by section, test against real user workflows, and train people on the specific screens they will use. Follow that order and the disruption stays small. Skip ahead and you will find the gaps in production.
Migrating Classic UI to Freedom UI?
Thirty minutes with Mohamed, who founded the company and still runs these calls himself. He will sketch your situation and tell you the cleanest path, including the times when that path is not us.